Setting Valve Lash
(The easy way)
I get many inquiries about setting lash and many times it seems this method confuses people needlessly.
Most published methods are accurate, but difficult and time consuming to perform. No one needs to do gymnastics jumping from one side of the engine to the other with both valve covers off. All this does is cool down your engine quicker, and exposes it to more chances for dirt/dust contamination.
Think about it, who wants to follow along with a little card that starts out with: “Find your Glasses so you can Read this card.” Those other methods expect you to know the firing order while they cryptically tell you to: “Put the exhaust valve #1 on base, Then Wiggle your nose and set #8 intake and #2 exhaust. Then put your right foot in, put your right foot out and turn the engine 37 degrees,” etc.
Who has time for that! There is a better way!
I suggest reading this in its entirety before starting (Maybe Twice!)
REFER TO THIS DIAGRAM WHILE READING THE STEPS BELOW
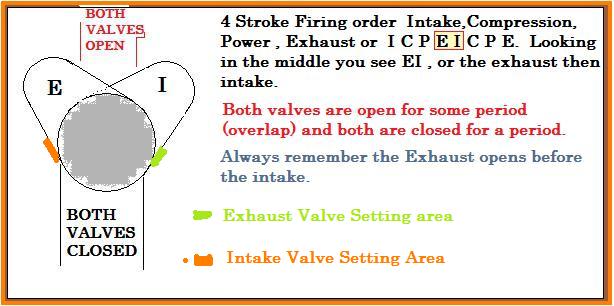
The key to understanding this method and remembering it properly is understanding the above diagram.
In any 4 cycle engine, the order of events is intake, compression, power, and exhaust. This repeats over, so by writing out 2 cycles (I, C, P, E – I,C,P,E) it becomes obvious that the exhaust valve will open before the intake. Keep in mind that before the exhaust closes completely, the intake begins to open. For this brief period of time, both valves are open (this is commonly referred to as the overlap.) As the engine continues to rotate, the intake then fully opens and then closes. Once this happens, both valves are closed for a brief period of time. The bigger the cam, the shorter the period becomes.
Lets get started!
Solid lifter (flat or roller) cams:
- Warm the engine up to operating temperature. Then take the valve cover off the driver side. (Note: Most lash settings are hot measurements and if you adjust them too cold the lash will be too loose)
- Turn the engine over until #1 Exhaust just starts to open then STOP. Doing this ensures you are on the front side of the exhaust lobe, not the overlap side. When you are on the front side of the exhaust lobe, the intake will be fully closed. Adjust the #1 Intake valve now.
- Once you have adjusted the intake lash turn the engine until the #1 exhaust opens all the way and closes, then continue turning the engine while watching the #1 intake open fully and STOP as it is very nearly closed again. This ensures you are on the back side of the intake lobe, and the #1 exhaust will be fully closed. (The reason for stopping just shy of the intake fully closing is to make sure you don’t go too far and pass thru the both valves closed area and start back opening the exhaust.) Adjust the #1 Exhaust valve now.
- Proceed to the next cylinder and repeat the process until that entire side of the engine is done. Have your assistant cleaning and prepping the driver’s valve cover while you adjust the lash. Have your assistant reinstall the drivers valve cover while you move on to the passenger side. On many engines, Mopar and Chevy for example, you will notice you have to do very little turning with the exception of one cylinder on the passenger side, this saves much time and effort.
- With practice and an assistant, you should be able to complete the driver’s side and the passenger’s side while the engine is still warm. The key is to try and complete both sides before the engine cools off. If for some reason, you get interrupted, or delayed, or if you are new at this, and then engine cools down too much, it is not the end of the world. You can always restart the engine and warm it up between the driver’s and passenger’s side adjustments. This method gives you the flexibility to adjust one bank of the engine while leaving the valve cover installed on the other side. You can’t do this if you have both valve covers off, so only pull the valve cover when you are ready to work on that side of the engine.
Quick Recap Solid Lifters
For each cylinder, roll the engine until the exhaust just starts to open, then adjust that cylinders intake lash. Then roll thru the exhaust valve completely opening and closing, and the intake opening and STOP just before it is closed. Then adjust the exhaust on that cylinder. Repeat until all cylinders are done.
Hydraulic Lifter Adjustment:
Hydraulics require preload not lash so the method is slightly different. Adjusting hydraulic lifters can be done basically the same and in many cases both rockers can be adjusted at the same time. Just make sure to stop about 20 degrees or so after the intake for that cylinder closes so as not to end up with the exhaust starting to open.
Once the rocker(s) in question are ready to adjust, back them off until they are loose enough to rattle. Take the pushrod you are adjusting between your thumb and forefinger and spin lightly while slowly tightening the adjuster. (Remember, don’t hold it too tight or apply up or down pressure)
As SOON as you feel a slight drag, you are at zero lash – you must hold the pushrod lightly to feel this. Once you have zero lash, you must turn the adjuster enough to preload the lifter properly. The old “turn it ½ turn” method may or may not be correct.
Most performance lifters have a specified preload which you can get from the manufacturer if you don’t know. Many are less than ½ turn. Your adjusters are generally fine thread fasteners, and move a certain part of an inch per revolution. Below is a list of standard sizes and how far they move per turn- Find the correct figure for your adjuster size and divide it by your specified preload.
Example:
Your lifter preload is spec’d at .008 -.012 and you have 3/8” adjusters. Divide .0419 by.008=5.24. Divide .0419 by.012= 3.49 Put a 1 over that or 1/5.24 - 1/3.49 or about 1/5th to 1/3rd turn is your specified preload.
Adjuster Size Travel /Turn
5/16 -24 .0419
3/8 -24 .0419
7/16 -20 .0500
It is ok to use the specified figure for cold fire up, but expect to readjust hot to get it perfect. Also keep in mind that new equipment will wear in and you will probably need to readjust a couple times in the first few hours of use before they “take a set”.
Be Careful, you don’t want them too loose, because you run the risk of pounding the retainer ring out of the lifter body or at the least having noisy lifters. Too tight and your valves may not fully close and will surely float at an early rpm. Valve Float can cause a car to lay over or even start to backfire at a relatively low rpm. It may run great up to 4000 rpm, then its like someone puts on the breaks and it falls on its nose.
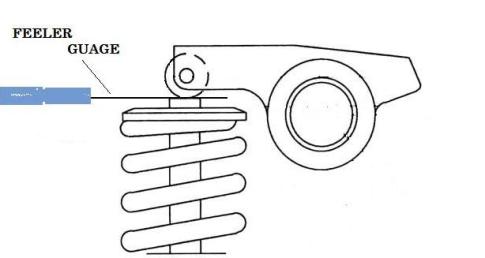
Now for some Lash Setting Techniques.
One of the most common mistakes I see is holding the gauge wrong. You need to hold it on the same angle as the valve tip as below-
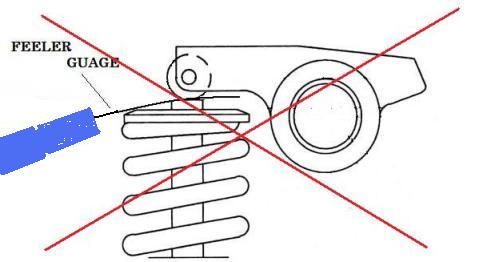
Do NOT hold it with down or up pressure as below- this gives an inaccurate adjustment due to the gauge occupying more space than it should or dragging on the retainer/rocker-
When the rocker is adjusted properly, there will be a fair amount of drag when you pull it out- a gauge .001 bigger should not fit –you should barely be able to insert the gauge back in once you remove it.
Be aware of the side pressure on the rockers-when one is open it can sometimes “drag” the other one open-this is one of the main reasons for adjusting when the rockers are nearly closed- if you are not sure, wiggle the one you are adjusting a little to make sure it is free to move . If it is tight, bump the engine just a bit (15-20 degrees) to free it up.
Setting Lash on a New Engine Prior to First Fire
If you are lashing a new engine prior to fire up, or setting the valves cold for some other reason, the lash settings need to be TIGHTER than the hot lash. The Exception will be an all iron engines. I recommend setting cold only when you have to. The only proper way to get the exact adjustment is hot as specified. The recommendations below are relatively common. A few thousandths loose probably won’t hurt just to get the engine warm as long as you don’t take it to 10,000rpm:
The Most Common Combinations:
Iron block with Iron Heads: ADD .002” to Lash Settings
Iron Block with Aluminum Heads: Subtract .006” from Lash Settings
Aluminum Block with Aluminum Heads: Subtract .012” from Lash Settings